My mom got this recipe from a Japanese cooking magazine decades ago and I remember all of our faces lighting up after our first bite as we realized we just tasted the best cream puffs we’ve ever had. This recipe instantly became a family favorite and although it is the taste of the cream puffs we love, the tradition of making it at my mom’s house, using the same pans that she’s had since the beginning of time, and taking turns mixing, is what makes it that much more special. The magazine pages have long disintegrated between all of us touching it and spilling stuff on it, but we’ve saved the recipe and it has become a cherished family recipe, even acheiving Christmas tradition status.

It’s not a difficult recipe, but it has a couple of components, and you do get a good arm workout from all the mixing. You also have to pay attention when baking, it’s not a throw in the oven and walk away recipe. When you’re making cream puffs for a large number of people who won’t be satisfied with just a couple, this can be quite the endeavor. The effort is so worth it though, especially if everyone chips in and helps! 
Why do I consider these cream puffs Japanese (called shu cream in Japanese, like choux à la creme in French)? I think it’s the taste of the cream filling and the thin delicate puff that reminds me of Japanese shu cream. Of course, cream puffs are a French invention, so these cream puffs are actually Japanese-style, French cream puffs.
My daughter and I made several test batches tweaking baking temperatures and times to get the puffs to look like the ones we make at my mom’s (same exact recipe, but different ovens). So, keep that in mind if you give this recipe a try, you may have to tweak baking times to get it just right for your oven. My mom has an electric oven, while we have a gas oven. My theory for having to have a higher initial bake time (425º F rather than 400ºF) with our gas oven is because the act of opening and closing the oven door lowers our oven temperature closer to 400º F. If your oven maintains its internal temperature even when the door is open and closed, then start with 400º F as your initial bake temperature (also if you don’t have a heavy duty baking pan to prevent too much browning or burning on the bottom).
If you want to give it a try, first things first, get your oven preheated (425º F or 400º F as explained in the above paragraph) and your ingredients measured out. Getting a high initial temperature is crucial for the puffs to rise. The ingredients for the puff includes only water, butter, flour and eggs. Measure out your ingredients before you start, you won’t have time to measure as you go along. We’ve had the best results when measuring the flour and butter by weight, but I’ve also included measurements by volume (recipe below) in case a scale isn’t handy.

Place a medium-sized pot on medium heat and melt the butter in the water. Bring to a boil, take off heat and immediately add the flour.
Mix vigorously until incorporated and then return the pot to medium low heat
Stir for at least 5 min (my mom thinks this step is what’s important in getting the delicate puffs) on medium heat pushing the dough along the bottom surface of the pot and spreading it to the sides. You will see a thin film developing on the bottom. If the butter starts separating out and sizzling, the heat is too high, reduce heat to medium low immediately. 
Remove from heat and let cool for about 5 minutes. Add eggs two at a time, mix immediately after adding to prevent the eggs from scrambling. This step was much easier when there was two people, one adding the eggs and the other immediately mixing. It’ll take time to incorporate all of the eggs, and make smooth. Our arms were getting tired by now. (Update: I’ve been using my KitchenAid mixer to incorporate the eggs with similar end results – so much easier!).
The batter was then dropped rounded teaspoonfuls at a time onto a baking sheet with a silpat (at my mom’s house we use parchment paper, I’ve also used a lightly greased pan as well) to prevent the puffs from sticking. Try to round them up, so that they will be more puff shaped. You can pat down any batter that is sticking up with a finger dipped in water.

Open the door of the oven (once preheated) and quickly place your pan inside and close the door. The initial high temperature is crucial. Keep the oven door closed during the entire baking time, not even a peek. I like to put the light in my oven on and watch the puffs rise. Keep an eye on the puffs, making sure the initial temperature was high enough for the puffs to rise. If they didn’t rise as high, you might want to try raising your starting temperature by 25º F. Once the puffs rise, continue to bake while reducing the temperature every 5 minutes. The low temperatures are important to let the puffs dry out. You may be alarmed at how hard the puffs are when they come out of the oven, but they soften a bit as they cool.
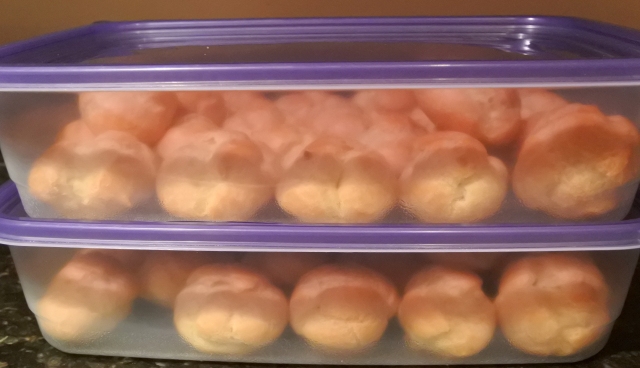
Once the puffs are done, remove them from the oven and let them cool on a drying rack. 
Cut the puffs in half and add the custard and whipping cream. I like equal volumes of custard and cream, but there is no right or wrong way here. In fact, if you don’t like custard like my hubby (gasp!), then you can just fill it with whipped cream and fresh fruit. Berries, such as strawberries go particularly well. 

There are two camps regarding when it’s best to eat the puffs. One group believes the puffs should be eaten freshly baked, so they are a bit crispy, airy and light. The other camp believes you should put the puffs in a sealed container overnight to let them soften a bit. I like both ways, but if I had to choose, I would choose the freshly made puffs. If you want to eat your puffs this way, it takes a bit of planning because you have to make your custard cream ahead of time and chill it, warm custard just doesn’t taste as good.
Speaking of custard cream, this recipe also came from the same Japanese magazine. It’s basically made of milk, egg yolks, flour, sugar, and vanilla. Again, measure out your ingredients before you start.
Start out beating the egg yolks and sugar until light in color.
 On medium heat, scald the milk and vanilla (taking care not to burn the milk, don’t ask me how I know :) )
Fold the flour into the beaten egg yolk mixture.

Add the milk to the egg yolk mixture by tempering the eggs first (add a small amount of milk first and mix) and mix in the rest of the milk a little at a time. Pour the mixture through a strainer into a medium sized pot on medium heat.

Stir constantly until mixture thickens and completely changes consistency (no foam or liquid left).
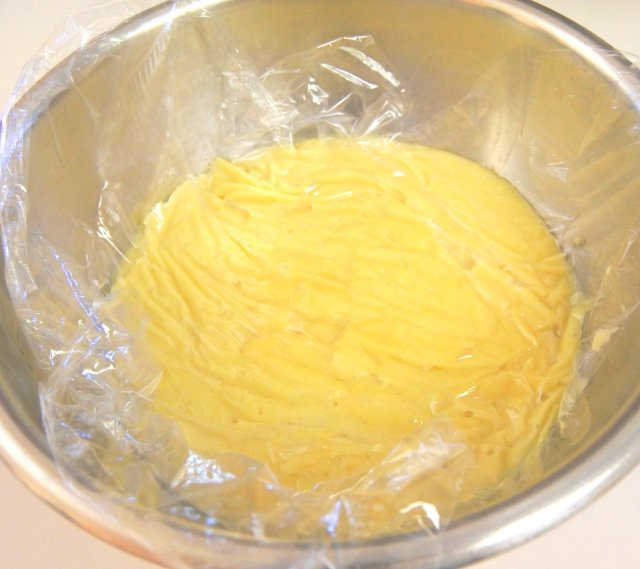
Pour the custard into another container and let cool, cover with plastic wrap to prevent film from forming. Put in refrigerator once it’s cool enough, and chill thoroughly. This custard will retain its shape when spooned into a puff.
Another delicious way to enjoy the puffs is to fill them with ice-cream and put them in the freezer overnight (called shu ice). I like my cream puffs plain on top, but you can shower them with some powdered sugar or drizzle them with melted chocolate to make them extra fancy. You can get real creative with the fillings, making them all kinds of different flavors (chocolate, strawberry, matcha, etc…)
The puffs freeze well and we’ve stocked our freezer with many from our numerous test batches. I’m finding that mini sized ones are great to bring on our weekend trips. I mix custard, pudding, or whatever we have on hand, and cool whip together, put them in a pastry bag with a round pastry tip and fill the puffs up by jabbing the pastry trip through the bottom and squeezing the filling inside. I load them up in a tupperware and pack them in the cooler. They are a fun treat to pop in your mouth for a snack (no mess!).
Japanese Cream Puffs (shu cream)
Ingredients
- 250 ml water (1 cup)
- 120 g butter (~ 1/2 cup or 1 stick)
- 130 g all-purpose flour (a little more than 1/2 cup)
- 5 eggs
Directions
- Preheat oven to 425º F (start at 400ºF if you don’t have a heavy duty pan).
- Heat water and butter on medium heat, let the butter melt completely and allow the mixture to come to a boil.
- Remove butter mixture from heat and add the flour all at once.
- Mix vigorously until flour is incorporated and forms a dough.
- Return to medium heat and stir continuously about 4-5 minutes, spreading the dough with the back of a wooden spoon on the bottom of the pot (if the butter starts separating out and sizzling, reduce the temperature).
- Remove from heat and let cool for 5 minutes.
- Add eggs, two at a time and mix vigorously with a wooden spoon immediately after adding the eggs to prevent them from scrambling. (Lately, I’ve been using my KitchenAid mixer with the paddle attachment, mixing the mixture first before adding the eggs to cool the mixture then adding the eggs. Keep the mixer going until all of the eggs are incorporated.)
- Place the batter, about a rounded teaspoon at a time on a heavy duty baking sheet lined with a silpat or parchment paper (Update: I prefer parchment paper, the puffs seem to rise better on this surface). A thick heavy duty baking sheet is important to prevent the bottoms from burning at the high temps.
- Bake at 425º F for 10 minutes or 400º F if not using a heavy duty baking sheet (Keep a close watch and adjust as needed. If the puffs don’t seem to have puffed enough, bake 2 more minutes at this temp), then reduce the temperature to 375º F and bake for 5 more minutes, then 350º F for 5 minutes, and finally 300º F for 5 minutes. Move puffs to a cooling rack.
Keep the time you have your oven door open to a minimum, then once closed do not open the door until the baking is done.
Custard
Ingredients
- 500 ml of milk (2 cup)
- 1 teaspoon vanilla
- 6 egg yolks
- 150 g sugar (a little less than 2/3 cup)
- 60 g flour, sifted (1/2 cup)
Directions
- Combine milk and vanilla in a small pot and heat over medium heat until just before boiling point (should start to see small bubles on the edges, but not boiling).
- Beat egg yolks and sugar until light in color.
- Add the flour and fold in to the yolk mixure.
- Add a small amount of the scalded milk and temper the egg mixture (quickly stir after adding a small amount of milk). Stir in the rest of the milk.
- Strain mixture into a medium-sized pot.
- Heat on medium heat and bring to a boil, stirring constantly until the mixture thickens (this happens pretty quickly). Optional: strain one more time into a container for storage to make it even smoother.
- Let cool, lay plastic wrap over the custard to prevent a film from forming. Store custard in the fridge until ready to use.
For the whipped cream, I usually add about 1-2 tablespoons of sugar to 1 cup heavy cream and whip. We’ve also tried stabilized whipped cream (allrecipe.com) which adds gelatin, but being the strange family that we are, we actually prefer cool whip.
Hope you give this Japanese shu cream recipe a try! You’ll be amazed at how delicate the cream puff shell is. Make sure you try the cream puffs after baking when the shells are still crisp and also the next day when softened.


OMG! Absolutely looks delicious…I don’t know…I might just have to bust my diet a bit and try making these for myself. I’ve tasted these in Japan (when I visited many years ago) and it was awesome. And now I have the recipe…thanks so much! 🙂 Well, my cooking skills may not be up to par like yours so we will see how mine turn out, but kudos to you for getting all of those cream puffs made in time! They must have loved and enjoyed it! 🙂
LikeLiked by 1 person
The things we do for our kids! 🙂 That’s great that you know what authentic shu cream tastes like. Sorry, don’t bust your diet! With the few puffs I have remaining in the freezer, I’ve been filling them with nonfat greek frozen yogurt. They’re pretty darn good and healthy-ish.
LikeLiked by 1 person
What a great idea! Greek frozen yogurt…hmmm 🙂 The cream though unfortunately is what makes the puffs (at least for me) so I think 1 or 2 might be worth it! 🙂
LikeLiked by 1 person
Absolutely awesome recipe. We know what we’ll be making this weekend. I know my waistline will show but that’s okay. Thanks Aya.
LikeLiked by 1 person
Lol, don’t want to extend anyone’s waistline. 🙂 Thanks for your kind words!
LikeLiked by 1 person
Its a hard job but someone has to eat these foods to make sure they are good, lol.
LikeLike
Wow. I Have tasted yours but too long ago. Be by to cook and eat—–in my imagination. 👍 What a delicious school project!!!
LikeLiked by 1 person
Wish I could send you some! 🙂
LikeLike
These cream puffs look so similar to mine and the recipe also, I love making them, thanks for reminding me of them 🙂
LikeLiked by 1 person
That’s great! Thanks for stopping by 😄
LikeLiked by 1 person
“Fifty cream puffs by Monday” . . . eek, you make me appreciate that my biggest challenge is finding the bedtime lovey (for a couple more years). Beautiful photos!
LikeLiked by 1 person
Finding those bedtime loveys is no easy feat 🙂 I guess there will be challenges every step of the way, but I’m glad I’m still needed.
LikeLike
yumm… i m hungry
LikeLiked by 1 person
Love it! Hahaha 🙂 Yes, the Japanese can always make it their own even changing the spelling of the original to SHU (close to the French pronunciation) making it authentic Japanese :-). This is actually French CHOUX (à la crème) – a filled French choux pastry ball with a typically sweet and moist filling of whipped cream, custard, pastry cream.
HAPPY BAKING!
LikeLiked by 1 person
Lol, you are soooo right! 🙂
LikeLiked by 1 person
We absolutely love cream puffs! Once you have that filing recipe down, you can make whatever flavour filling you like! We made a matcha flavour one 🙂
LikeLiked by 1 person
Haven’t tried matcha flavored custard yet, sounds yummy! 🙂
LikeLike
Wow! I could eat them straight off the screen!
LikeLiked by 1 person
Lol, thanks for commenting 😂
LikeLiked by 1 person